
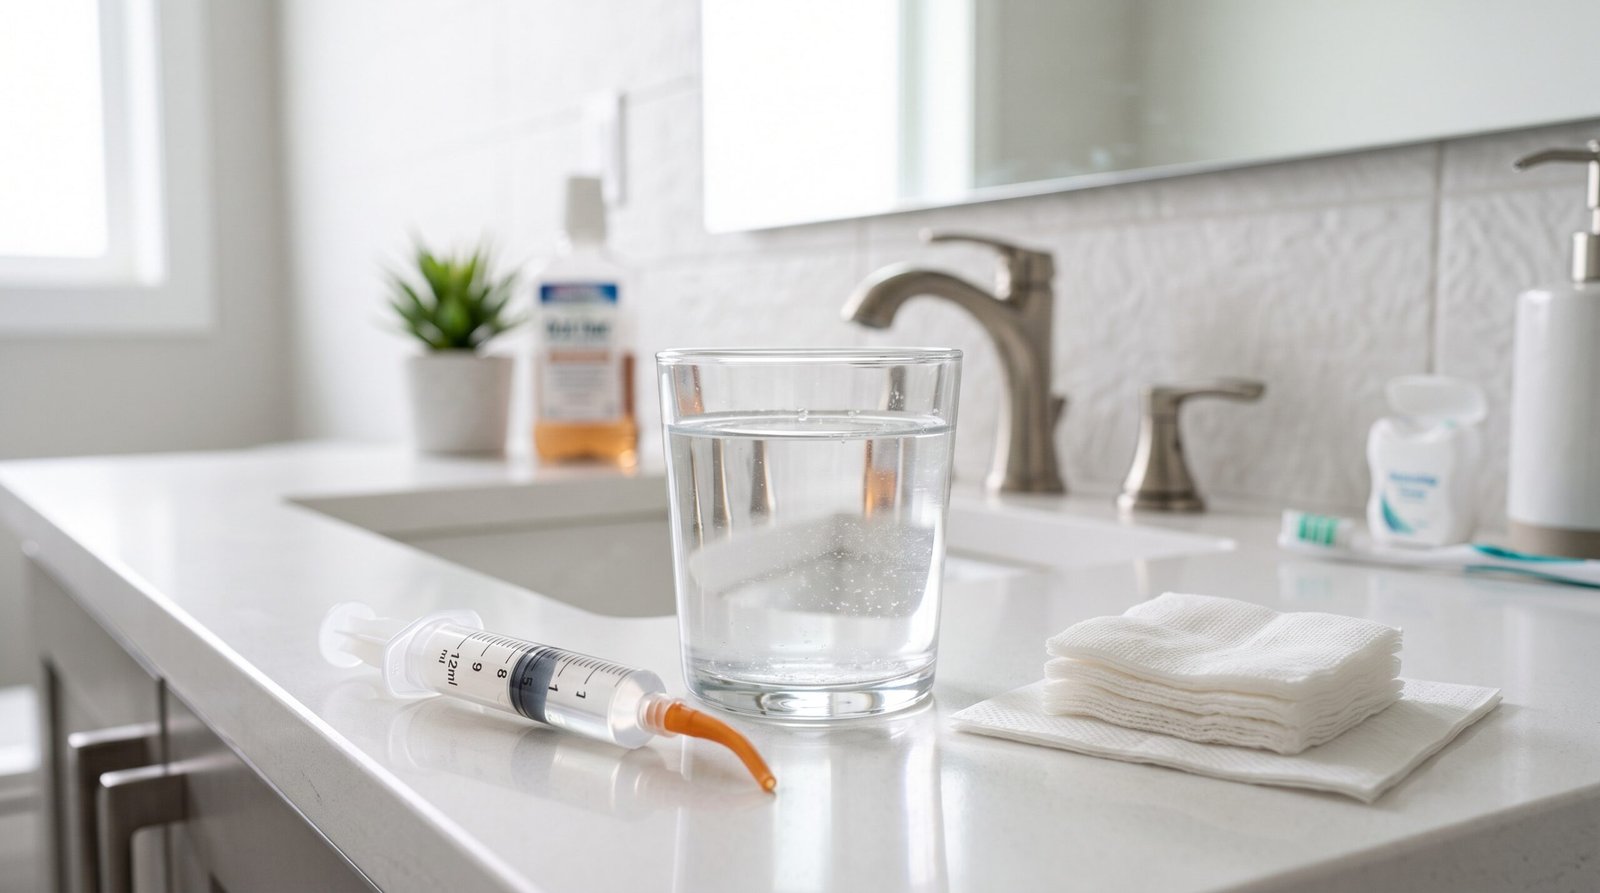
Recovering from wisdom teeth extraction requires patience, careful dietary choices, and a delicate touch when it comes to oral hygiene. As you begin transitioning from liquids to soft solids, you will likely encounter an uncomfortable sensation: stray food particles settling directly into the open sockets where your third molars used to be.
The instinct to clear out trapped debris is immediate, but standard cleaning methods can easily disrupt your body’s natural healing process. Understanding how do you get food out of wisdom teeth holes safely is critical for preventing complications like dry socket, localized infections, and delayed tissue closure.
This comprehensive guide covers everything you need to know about removing food from extraction sockets safely, from gentle rinsing techniques to the exact tools you should—and shouldn’t—use.
Why Food Gets Trapped in Wisdom Teeth Sockets
When an oral surgeon or dentist removes a wisdom tooth, an open void remains in the jawbone and gum tissue known as an extraction socket. Over the first several weeks of healing, this socket gradually fills in from the bottom up with specialized granulation tissue before bone remodeling occurs.
During this healing window, these empty spaces naturally act as pockets where food particles can lodge. Several anatomical factors contribute to debris getting trapped:
- Location: Wisdom teeth sit at the very back of the mouth, an area that is naturally harder to see, reach, and keep clear.
- Gravity and Chewing Dynamics: Lower extraction sockets are especially prone to collecting debris simply due to gravity and the natural movement of food boluses across the tongue and back molars.
- Depth of the Wound: Surgical extractions involving impacted teeth leave deeper crevices that take longer to close completely.
While having food in your extraction site is annoying and can produce an unpleasant taste, understanding the timeline of clot stabilization ensures you address it without causing harm.
The Golden Rule: Protect the Blood Clot First
Before attempting to remove any food, it is crucial to recognize what is already inside the socket: the initial blood clot.
In the first 24 to 72 hours after surgery, your body forms a protective blood clot over the exposed bone and nerve endings. This clot serves as the foundation for new tissue growth and acts as a biological shield against oral bacteria.
If you aggressively pick, poke, or flush the area during the early stages, you risk dislodging this clot—leading to a condition known as alveolar osteitis (dry socket). Dry socket is notoriously painful, exposes underlying nerves, and significantly prolongs recovery time.
Method 1: The Gentle Warm Saltwater Rinse (Days 2 to 7)
For the first week following surgery (starting 24 hours post-operation), a warm saltwater rinse is the safest and most effective method to dislodge food particles.
Step-by-Step Saltwater Technique:
- Mix the Solution: Dissolve 1/2 teaspoon of table salt into 8 ounces of lukewarm water. Ensure the water is comfortably warm, not hot.
- Take a Small Sip: Take a moderate mouthful of the saline solution without swishing forcefully.
- Tilt, Don’t Swish: Tilt your head from side to side, allowing the warm liquid to gently wash over the back corners of your mouth.
- Passive Release: Lean over the sink and open your mouth to let the water fall out naturally. Never spit, as the negative pressure created by spitting can dislodge the clot.
- Repeat: Repeat this process 2 to 3 times after every meal or snack.
Saltwater acts as a natural mild antiseptic, reduces swelling, and helps dissolve soluble food residue without mechanical irritation.
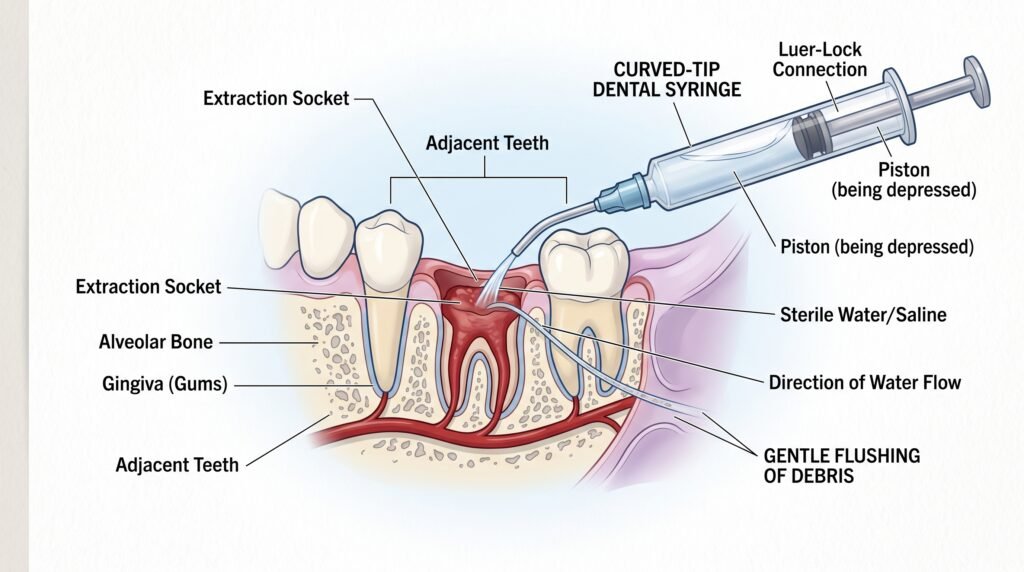
Method 2: Using a Curved-Tip Irrigation Syringe (Day 7 Onward)
If your dentist or oral surgeon provided a plastic curved-tip syringe (often called a monoject syringe), you should typically wait until around Day 5 to Day 7 before using it, unless directed otherwise by your provider.
How to Safely Irrigate the Socket:
- Prepare the Liquid: Fill the syringe with warm tap water or your prepared saline rinse.
- Position Under Good Light: Stand in front of a well-lit mirror. Pull your cheek back gently to gain clear visibility of the lower socket.
- Place the Tip Carefully: Bring the plastic tip close to the opening of the hole. Do not force the tip deep into the socket.
- Flush Gently: Press the plunger with steady, light pressure. The stream will flush beneath the food particle, floating it up and out into your mouth.
- Empty Without Spitting: Let the rinse drain out over the sink.
Note: If you feel sharp resistance or pain, stop immediately and reduce the water pressure.
What You Should NEVER Do to Clear a Socket
When a piece of food feels stuck, the temptation to use common household items or strong physical suction can be overwhelming. Avoid the following dangerous habits at all costs:
1. Toothpicks, Needles, or Tweezers
Hard, pointed objects can pierce delicate healing tissue, introduce harmful non-sterile bacteria, restart bleeding, and permanently damage developing bone cells.
2. High-Pressure Water Flossers
While water flossers are excellent for routine hygiene, standard electric water flossers produce pulses that are far too powerful for recovering surgical sites. Even on the lowest setting, they can blast away the blood clot and lacerate new tissue.
3. Sucking Actions and Drinking Straws
Using drinking straws, smoking, or creating suction with your tongue creates strong negative pressure in the oral cavity, which is the leading mechanical cause of dry socket.
4. Probing with Your Tongue or Fingers
Constantly poking the socket with your tongue disrupts tissue formation and pushes food fragments deeper into the socket rather than coaxing them out.
What If the Food Won’t Come Out?
It is common for small particles—such as grains of rice or fragments of soft bread—to remain somewhat stubborn even after gentle rinsing. In most cases, this is not an immediate medical emergency.

Why You Don’t Need to Panic:
- The Body Naturally Expels Debris: As new granulation tissue grows from the bottom and walls of the socket upward, it naturally pushes foreign material outward toward the surface.
- Saliva Breaks It Down: Natural oral enzymes constantly work to dissolve small organic carbohydrates and proteins over time.
- White Tissue Isn’t Always Food: Many patients mistake white or greyish tissue inside the hole for stuck food. In reality, healing granulation tissue and collagen matrix naturally appear off-white or yellowish during days 3 through 10.
If a piece of food remains in place but is causing no pain, throbbing, or swelling, simply continue your regular saltwater rinses after meals. Avoid obsessively flushing the area multiple times an hour.
Dietary Adjustments to Prevent Trapped Food
The most straightforward way to manage food in extraction sites is to choose foods that are unlikely to get wedged in the first place during the initial 10 to 14 days.
| Safe Recovery Foods | Foods to Strictly Avoid |
|---|---|
| Smooth yogurt, pudding, & applesauce | Popcorn, sesame seeds, & chia seeds |
| Blended vegetable soups (lukewarm) | Rice, quinoa, & small grain salads |
| Smooth mashed potatoes | Nuts, chips, & crunchy crackers |
| Scrambled eggs & soft tofu | Chewy, crusty bread & tough meats |
| Protein shakes (eaten with a spoon) | Spicy, acidic, or heavily peppered dishes |
Gradually reintroduce firmer foods only as your comfort and jaw mobility improve, always following up meals with a warm, passive rinse.
Signs of Infection vs. Normal Recovery
While mild discomfort, stiffness, and occasional trapped debris are standard aspects of wisdom teeth recovery, certain symptoms warrant immediate contact with your oral healthcare provider:
- Throbbing Pain: Intense pain radiating toward your ear or neck that worsens after day 3.
- Persistent Foul Odor or Taste: A constant bitter or sour taste that does not improve after rinsing.
- Visible Pus or Discharge: White, yellow, or greenish exudate around the socket.
- Fever: A body temperature exceeding 100.4°F (38°C).
- Progressive Swelling: Swelling or jaw tightness that increases after day 3 instead of decreasing.
If any of these signs develop, schedule a follow-up visit. Your dentist can irrigate the area under sterile conditions, apply medicated dressing, or prescribe targeted antibiotics if necessary.
Summary of Safe Recovery Steps
Taking care of your extraction sockets does not have to be stressful. Keep these core principles in mind:
- Be Patient: Never rush to clean the socket during the first 24 hours.
- Rinse Gently: Use warm salt water with a gentle head tilt from Day 2 through Day 6.
- Use the Syringe Correctly: Introduce a curved-tip syringe only after the first week, using low pressure.
- Avoid Sharp Tools & Suction: Keep fingers, toothpicks, straws, and high-pressure flossers away from your healing jaw.
- Listen to Your Body: Contact your surgeon if you experience severe pain, foul discharge, or worsening swelling.
Frequently Asked Questions (FAQs)
How long do wisdom teeth holes take to close completely?
Soft gum tissue generally closes over the socket within 3 to 6 weeks, while the underlying jawbone takes anywhere from 3 to 6 months to remodel and fill in completely. The hole becomes noticeably smaller and less prone to trapping food after the second week.
What happens if food stays trapped in a wisdom tooth hole?
If small soluble particles remain, your saliva and natural tissue regeneration will usually dissolve or push them out. However, if large, firm particles (like seeds or hulls) remain trapped for an extended period, they can lead to localized inflammation, bacterial overgrowth, foul breath, or mild infection.
Can I use mouthwash to clean wisdom teeth holes?
Avoid commercial alcohol-based mouthwashes for the first week, as alcohol can sting, dry out the oral mucosa, and irritate healing tissues. If your surgeon prescribed a chlorhexidine gluconate antimicrobial rinse, use it strictly as directed, using gentle swishing motions without forceful spitting.
Is that white stuff in my wisdom tooth hole food or healing tissue?
In most cases, white or cream-colored matter inside the socket after day 3 is granulation tissue—a normal, healthy matrix of collagen, white blood cells, and tiny blood vessels essential for healing. If it does not wash away with a light saltwater rinse, do not attempt to scrape or dislodge it.




![When Can You Brush Teeth After Extraction? A Complete Recovery Guide Facing a tooth extraction, whether it’s a simple pull or complex wisdom tooth surgery, is a significant dental event. While the procedure itself is often over quickly, the recovery period is when your body does the hard work of healing. One of the most common and crucial questions patients ask is: when can you brush teeth after extraction? The short answer is: Do not brush immediately. A delicate healing process begins the moment the tooth is removed, and understanding the precise timeline for resuming your oral hygiene routine is essential for preventing complications. Dislodging the blood clot that forms in the socket can lead to severe pain, delayed healing, and conditions like dry socket. This comprehensive guide will walk you through the entire recovery process, answering the vital question of "when can you brush teeth after extraction" while providing essential tips for immediate care, signs of complications, and how to maintain oral hygiene safely during this critical time. [FEATURED IMAGE — PLACE AT THE TOP OF THE ARTICLE] 1. The Critical First 24 Hours: Protecting the Blood Clot The first 24 hours following your tooth extraction are arguably the most important for successful healing. This initial phase is dedicated entirely to stabilizing the surgical site and allowing a robust blood clot to form in the empty socket. This clot serves as a protective barrier, safeguarding the underlying bone and nerve endings. Why You Wait 24 Hours This is why the definitive answer to when can you brush teeth after extraction is after the initial 24-hour window has passed. Introducing bristles—even soft ones—near the site, rinsing vigorously, or spitting forcefully during this time can create suction or mechanical force that dislodges the blood clot before it can mature. 2. Establishing Your Immediate Post-Op Timeline To help you visualize the recovery journey, here is a general breakdown of when you can expect to resume normal oral activities, leading up to when can you brush teeth after extraction. Timeline (Post-Op) Activity Allowance Why? 0 – 24 Hours NO Brushing, Rinsing, or Spitting. Protect the newly forming blood clot. Day 1 (24 Hours Later) Brush adjacent teeth very gently. Skip the site. Start removing plaque, but avoid the healing socket. Day 2 – 3 Continue gentle adjacent brushing. Start warm salt water rinses. Salt water keeps the socket clean without force. Day 4 – 7 Very light, gentle brushing of the outer edges near the site (with dentist approval). The socket is stabilizing, but still needs caution. Day 14+ Return to normal brushing (usually). The socket is typically closed and fully stabilized. 3. When Can You Brush Teeth After Extraction? (The 24-Hour Rule) [IMAGE 2 — INSERT HERE] The cornerstone of successful extraction recovery is waiting. You must abstain from all brushing, vigorous rinsing, and spitting for at least the first 24 hours. Your dentist is the final authority, and complex surgeries may require an even longer wait time. However, for most patients, 24 hours marks the point where very careful hygiene can cautiously resume on the other areas of your mouth. 4. How to Safely Clean Adjacent Teeth (Day 2 and 3) Once the first 24-hour barrier has passed, you can begin cleaning your mouth, but with extreme caution. The primary goal is to minimize plaque buildup in adjacent areas without disturbing the extraction site. The Technique for Cleaning Adjacent Teeth Use a Super-Soft Toothbrush: If your current brush is medium or firm, switch to a soft one temporarily. Use Minimal Paste: Too much toothpaste requires more rinsing and spitting. A tiny amount of non-abrasive paste is sufficient. Brush Everywhere Else: Carefully brush your tongue, the insides of your cheeks, and all teeth not immediately bordering the extraction site. Approach the Site Vertically: When cleaning the neighboring teeth, do not use horizontal scrubbing motions near the socket. Instead, brush vertically away from the gumline. Stop several millimeters before reaching the extraction wound. 5. Rinsing: The Right Way and the Wrong Way While you are wondering when can you brush teeth after extraction, learning how to rinse safely is equally vital. Rinsing incorrectly can be just as damaging as brushing too soon. The Danger of Vigorous Spitting In the initial days, powerful swishing and forceful spitting create significant negative pressure (suction) inside your mouth. This suction can yank the blood clot right out of its socket, leading to the painful condition known as dry socket. The Safe Salt Water Rinse Method Starting approximately 24 hours after your surgery, you should begin rinsing with a warm salt water solution (1/2 teaspoon of salt in 8 ounces of warm water). Here is how to do it safely: Gentle Introduction: Take a sip of the solution, tilt your head slightly, and let the liquid wash around the socket without forceful swishing. Passive Rinsing: Gently move the solution from one cheek to the other without muscle action. The "Dribble Out" Method: To empty your mouth, lean over the sink and simply open your mouth, letting the solution gravity-drain or dribble out passively. Do not spit. 6. What About Normal Rinsing and Electric Toothbrushes? As your recovery progresses, you will move from passive salt water rinses to standard oral care. When to Resume Standard Rinsing You can typically resume gentle, active swishing (with water or an alcohol-free mouthwash) around day 4 or 5, but check with your dentist. Use a gentle "oozing" action rather than a dynamic swish. When Can You Use Your Electric Toothbrush After Extraction? Electric toothbrushes are incredibly efficient, but their powerful ultrasonic or oscillating vibrations are too intense for a healing extraction site. Even on a low setting, the vibration can cause significant irritation. You should wait at least 7 to 10 days, and ideally until your dentist confirms full stabilization (often at a two-week checkup), before reintroducing an electric brush. When you do return to it, avoid touching the extraction site directly with the vibrating bristles for several weeks. 7. Understanding and Preventing Dry Socket (Alveolar Osteitis) The single biggest motivation for strict adherence to post-operative instructions and waiting until the safe time for when can you brush teeth after extraction is preventing dry socket. What is Dry Socket? Dry socket (alveolar osteitis) is a painful complication that occurs when the crucial blood clot either fails to form properly or is prematurely dislodged from the socket. This leaves the underlying jawbone and nerve endings exposed to air, food debris, and bacteria. It typically manifests 2 to 5 days after extraction. Signs and Symptoms of Dry Socket The main symptom is sudden, severe, radiating pain (sometimes to the ear) that is not controlled by prescribed pain medication. You may also notice a bad taste in your mouth and see visible bone instead of a dark clot when looking in the mirror. Brushing too early or too vigorously is a leading cause of this complication. [IMAGE 3 — INSERT HERE] 8. Essential Post-Extraction Care Tips for Smooth Healing Successful healing isn't just about when can you brush teeth after extraction; it also involves comprehensive care. Bite on Gauze: Maintain firm pressure on the initial gauze pack for 30–60 minutes to encourage clot formation. Rest: Avoid strenuous physical activity for at least 48–72 hours to prevent increased blood flow to the surgical area, which can cause bleeding. Manage Swelling: Apply a cold compress (20 minutes on, 20 minutes off) to your cheek for the first 24 hours. Stay Hydrated: Drink plenty of water. Avoid straws, as the suction can dislodge the clot. Eat Soft Foods: Stick to liquids, smoothies (no straw), mashed potatoes, yogurt, and scrambled eggs for the first few days. Gradually introduce firmer foods as comfort permits. 9. Complications and When to Contact Your Dentist While most extractions heal without incident, you must monitor for signs of serious complications. Knowing when can you brush teeth after extraction is part of managing your recovery, but so is recognizing when to seek help. Contact your dentist immediately if you experience: Severe pain that worsens rather than improves, especially 2–3 days post-op (possible dry socket). Uncontrolled bleeding that does not stop with prolonged gauze pressure. Fever or chills (signs of infection). Excessive or worsening swelling after the third day. A foul taste or persistent bad breath. Conclusion: A Smooth Recovery Starts with Patience Understanding when can you brush teeth after extraction is fundamental to a safe recovery. By strictly observing the 24-hour waiting period, using the "dribble out" method for rinsing, and cleaning adjacent teeth with meticulous gentleness, you provide the perfect environment for the essential blood clot to stabilize and the socket to heal properly. The key is balance: maintaining necessary oral hygiene elsewhere in your mouth while offering total protection to the healing site. Your patience in the first few days will be rewarded with a swift, complication-free, and healthy recovery. Frequently Asked Questions (FAQ) 1. When can you brush teeth after extraction? The critical timeframe to wait is the first 24 hours. You must avoid brushing and rinsing immediately after surgery to protect the new blood clot. You may very gently clean adjacent teeth starting 24 hours later, skipping the extraction site itself. 2. Can I use toothpaste immediately after my extraction? No. You should not use toothpaste during the first 24 hours, as this would require rinsing and spitting, which can dislodge the clot. When you begin gentle brushing on adjacent teeth (after 24 hours), use only a pea-sized amount of non-abrasive paste. 3. How do I clean my mouth if I can't brush the site? After the first 24 hours, begin gentle warm salt water rinses (using the passive "oozing" and "dribble out" method). You can carefully brush teeth that are NOT immediately bordering the extraction area, using a very soft brush and minimal paste. 4. What happens if I brush too early? Brushing too soon, especially near the socket, can break or dislodge the blood clot. This can lead to a very painful condition called dry socket (alveolar osteitis), delayed healing, and increased risk of infection. 5. When can I use my electric toothbrush again? Avoid using an electric toothbrush near the extraction site for at least 7 to 10 days, and ideally 14 days. The vibrations are too intense for the delicate healing tissue. Once you resume, keep the vibrating bristles away from the surgical area for several weeks.](https://dentistactivities.com/wp-content/uploads/2026/08/Gemini_Generated_Image_eyya6leyya6leyya-1-300x167.jpg)